Looking for a low cost way to have a SIP registered endpoint without a need to run your own VoIP server but still have all the great features of a much more expensive UCS system? The following will outline the steps needed to get a UniFi VoIP Phone (I buy from Streakwave UVP) registered to your Twilio account. New to Twilio? Read up on how the best cloud communications platform works.
Twilio Configuration
To begin preparing your Twilio account to accept SIP registrations, navigate to Programmable Voice -> SIP Domains, then create new SIP Domain. You will need to provide a Friendly Name (SIPTest) and unique SIP URI (siptest.sip.twilio.com). Under Voice Configuration we need to point to a URL where you can host the necessary dynamic language capable of parsing the sip dial string from our endpoint and pulling out the “Called” parameter and dynamically creating the proper TwiML response. Below is the code I used for this example (be sure to use authentication protected and encrypted URL’s). I have not looked into re-creating this script on Twilio Functions yet, but it would be best to keep costs low and reduce complexity. I need to research a little more and will update this blog post once I have a working example for using a Twilio Function.
<?php
$called = preg_replace('/sip:1?(.*?)@.*/', '{$1}', $_POST['Called']);
header("content-type: text/xml");
echo "<?xml version=\"1.0\" encoding=\"UTF-8\"?>\n";
ob_start();
var_dump($called);
var_dump($_POST);
$contents = ob_get_contents();
ob_end_clean();
error_log($contents, 3, "/tmp/twilio.txt");?>
<Response>
<Dial timeout="10" record="false" callerId="TWILIO_CALLERID">
<?= $called ?>
</Dial>
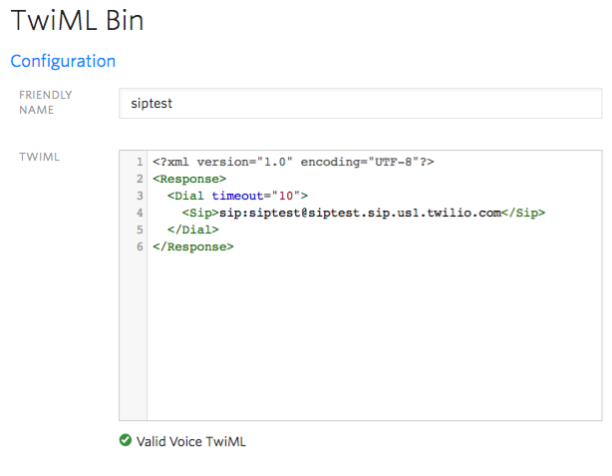
</Response>You will also need to tell Twilio what to do with inbound calls to your new endpoint. There are a ton of languages supported and a ton of ways to build smart SIP registered endpoint logic to handle any scenario. For this example, we are keeping it very simple and will just allow an incoming call to a Twilio hosted local number to ring our SIP registered endpoint. The below Twiml is what you program your Twilio number to use when someone dials it. You have the option to use a Webhook, TwiML via TwimlBin or the newly released Functions (more on Functions here).
Under Voice Authentication, create a new “IP ACCESS CONTROL LIST” and “CREDENTIAL LIST”. The IP Access Control list allows you to tell Twilio where to accept registration requests from and the credential list allows you to specify which credentials your endpoints will use to register. Under the SIP Registration, make sure you have enabled the ability for endpoints to register with your new domain then select the credential list entry you created earlier. That wraps up our Twilio side setup for now.
UniFi VoIP Controller and UVP Phone
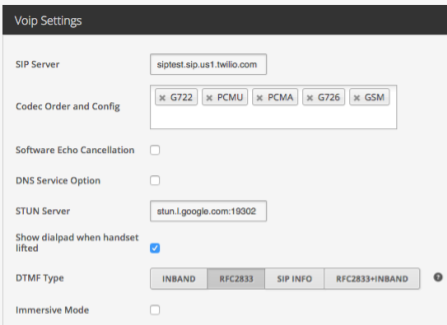
First we need to download the new VoIP controller from UBNT (https://www.ubnt.com/download/unifi-voip/) – version 1.0.5 is the latest. Since we only need the controller to program the phone, you can run this on your local machine. They have installers for Unix, Windows, Mac and Linux so you should be covered. Once you have your controller software installed and you ‘adopt’ your UniFi UVP phone, navigate to your Settings and Global Settings.
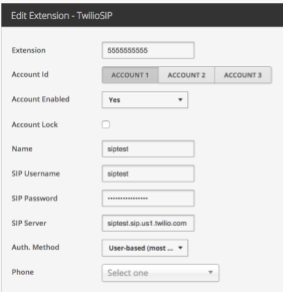
Then go to “Extensions” and “Create New Extension”. For extension, only digits are allowed so entering your Twilio number here might make sense. Name is whatever you want it to be but matching it to your Twilio SIP registration name helps keep things tidy. The SIP username and password need to match the Twilio credentials you created in the first section. Likewise, the SIP server needs to be your SIP URI you created above. Authorization method is User-based and select your discovered UVP phone from the dropdown.
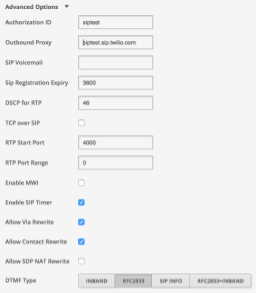
Additional settings under “Advanced Options” that I have tested as working successfully are listed below.
Once all your settings are in place – click Apply to save this configuration and push out the configuration to your UVP phone. If all goes well, you should see your phone reboot after receiving it’s configuration. Once your phone is ready, test by making an outbound call and inbound calls. Your phone should be able to call any outside line and you should be receiving inbound calls to new registered VoIP phone.
If you run into issues, the first place to start is to make sure your endpoint is registered. Navigate to your Voice SIP Domain and click on the “Registered SIP Endpoints” to do a search for your endpoint name under your domain. If registered, you should see one result under your device name. It should also allow your to see the type of phone and version in the results section along with contact and expiration information. Once you confirm you have a successful registration, it is just a matter of watching the logs if things are not working as expected and completing a little debugging.
As always – feel free to shoot me an email via this sites contact page or reach me on Twitter @cbackescom.