For years, the narrative around home security has been dominated by a handful of tech giants. They’ve made us believe that “smart” security requires a monthly subscription, a high-speed cloud connection, and—most concerningly—handing over the keys to our private data.
But here’s the truth: Your security footage belongs to you. You have a right to record your own property without a “Big Tech” middleman watching over your shoulder.
The Hidden Cost of the Cloud
While cloud-based cameras are marketed as convenient, they come with significant trade-offs that many residents don’t realize until it’s too late:
Privacy Vulnerabilities: When your footage is stored on a corporate server, you lose “physical” control. There have been numerous documented cases of tech employees or law enforcement accessing private clips without a warrant or the owner’s explicit consent.
The “Subscription Trap”: Many popular cameras become expensive paperweights the moment you stop paying the monthly fee. You’re essentially renting the right to see your own front porch.
Internet Dependency: If your Wi-Fi drops or the company’s servers go down, your “security” system is effectively blind.
Your Right to Local Ownership
Local storage isn’t just a technical choice; it’s a statement of digital independence. By using systems that record to an SD card, a Hard Drive (DVR/NVR), or a Network Attached Storage (NAS), you reclaim several fundamental rights:
Absolute Privacy: Your data never leaves your four walls. If it isn’t on the internet, it can’t be hacked remotely or handed over to third parties by a corporate legal department.
Zero Monthly Fees: Once you buy the hardware, you own the service. No “Pro” plans, no storage tiers—just 24/7 recording that you paid for once.
Reliability: Local systems keep recording even if the internet goes out. In a true emergency, that reliability is more valuable than any “smart” notification.
How to Make the Switch
Transitioning away from the big-name ecosystems is easier than ever. Brands like Ubiquiti offer powerful hardware that works entirely offline if you want it to.
Pro Tip: If you’re tech-savvy, look into “Self-Hosting.” Ubiquiti hardware and software allows you to build a professional-grade surveillance hub giving you the “Big Tech” features (like AI person detection) without the Big Tech privacy invasion.
In today’s world, privacy is becoming more and more of a concern for individuals and businesses alike. With the rise of digital communication, it’s becoming easier for people to access personal information without permission. Fortunately, there is a solution to this problem: a virtual phone number.
What is a cloud-powered phone number?
A cloud-powered phone number is a virtual phone number that is hosted on the cloud. This means that it is not tied to a physical location or device, and can be accessed from anywhere with an internet connection. It’s a great option for individuals or businesses that want to keep their personal phone number private, or for those who want a dedicated phone number for business communication.
Why use a cloud-powered phone number?
Privacy protection – One of the main reasons to use a cloud-powered phone number is for privacy protection. By using a dedicated phone number for business or other public communication, you can keep your personal phone number private and avoid unwanted calls and sms messages.
Flexibility – Another benefit of a cloud-powered phone number is its flexibility. Since it’s hosted on the cloud, you can access it from anywhere and on any device. This means that you can stay connected to your business contacts no matter where you are, without having to worry about missing important calls or sms messages.
Professionalism – Having a dedicated phone number for your business also adds an extra level of professionalism. It shows your clients and customers that you take your business seriously, and can help build credibility and trust.
How to get a cloud-powered phone number
Getting a cloud-powered phone number is easy and affordable. There are many services available online that offer virtual phone numbers for a monthly fee. Some even offer free trials, so you can try out the service before committing to it.
I use CloudNumber.app for my personal virtual, private cloud powered phone number which is super easy to get. Simply register for an account and select the plan that best suits your needs. Since I am using a CloudNumber for personal privacy, I use the starter plan. It is a no brainer when compared to receiving hundreds of spam calls or texts in a year.
In today’s world, protecting your privacy is more important than ever. A cloud-powered phone number is a great solution for those who want to keep their personal phone number private, or for businesses that want to add an extra level of professionalism to their communication. With its flexibility and affordability, a cloud-powered phone number is definitely worth considering.
Chances are you have heard about IoT or “Internet of Things”. It’s a big area of tech that estimates over 20 Billion IoT devices by 2020. Also, companies are likely to invest around $15 Trillion in IoT between 2017 and 2025. In this tutorial, we will dive into the world of IoT to obtain an understanding of what it takes to interact with these devices. While our example is simple, you can use these building blocks for more complex examples. Asset tracking or remote control of water pumps are just a couple of examples of what you could build. The possibilities are endless when you connect the Internet to things!
You have a Particle.io Electron development board and Twilio SIM
You have your Twilio SIM registered on your Twilio account
Programmable Wireless Setup
The first thing we need to do is verify our Twilio SIM is ready by navigating to the console and confirming your SIM has an ‘Active’ status. If you need additional support with preparing your SIM, please visit this Twilio Doc to help you get prepared.
Hardware Setup
For this example, we are using a Particle.io Electron 3G development board along with a Relay Shield board. Both parts can be sourced from Particle’s online store. Insert your ‘Active’ SIM into your Electron, specifically “SIM Card Holder” #4.
Next, power up your device and follow the 3rd-Party SIM setup from Particle. Once you have your Electron online and breathing cyan you are prepared to move onto the next step.
Create a New Laravel App
Now that you have a Twilio powered IoT device on the network and accessible from anywhere, it’s time to create our web application so that we can interface with it. Let’s start by running the following command in terminal:
$ laravel new TwilioIoT
Then add the Twilio SDK to your project.
$ composer require twilio/sdk
With our Laravel App created and our Twilio SDK installed, we are now ready to create our environment variables file. There is a starter file in your project folder named `.env.example` that we can copy to get us started. Simply run the following command to create your file.
$ cp .env.example .env
Then add the following variables to the bottom of your new .env file.
With our environment setup we can create our applications controller. Run the following command to create a blank controller file where we will add our actions.
$ php artisan make:controller WirelessController
First, let’s make sure we include the Twilio API SDK by adding the following to our list of namespaces right before the `class WirelessController` definition:
use Twilio\Rest\Client;
The following code will allow us to view any SIM associated with your Twilio account. Later, we will setup the view blade that is referenced in this action.
/** SIM List Page */
   public function Show()
   {
       $client = new Client(config('services.twilio.sid'), config('services.twilio.token'));
       $sims = $client->wireless->v1->sims->read();
       return view('sims', ['sims' => $sims ]);
   }
Now let’s add the other actions we will need. These will be the “Detail” and “Send” actions. The “Detail” action will allow us to show details about any particular SIM that a user wants to click on. The “Send” action will allow our users to send machine-to-machine commands to our device via the Twilio SDK.
/** SIM Detail Page */
   public function Detail(Request $request)
   {
       $client = new Client(config('services.twilio.sid'), config('services.twilio.token'));
       $simSid = $request->simId;
       $sim = $client->wireless->v1->sims($simSid)->fetch();
       $commands = $client->wireless->v1->commands->read(['sim' => $simSid]);
       return view('detail', ['sim' => $sim, 'commands' => $commands]);
   }

   /** Send Command to SIM */
   public function Send(Request $request)
   {
       $client = new Client(config('services.twilio.sid'), config('services.twilio.token'));
       $simSid = $request->input('sid');
       $command = $request->input('command');
       $client->wireless->v1->commands->create($command,
           array("sim" => $simSid)
       );
       return redirect()->back();
   }
Now let’s add our applications layout file. In your `/resources/views/` folder create a new file called `app.blade.php` and just copy and paste the following example code into it. As you can see, this file defines which fonts and styles we will use in our app. It also includes a placeholder for any additional scripts or content we will add. We will reference this file in the following steps to create our new pages.
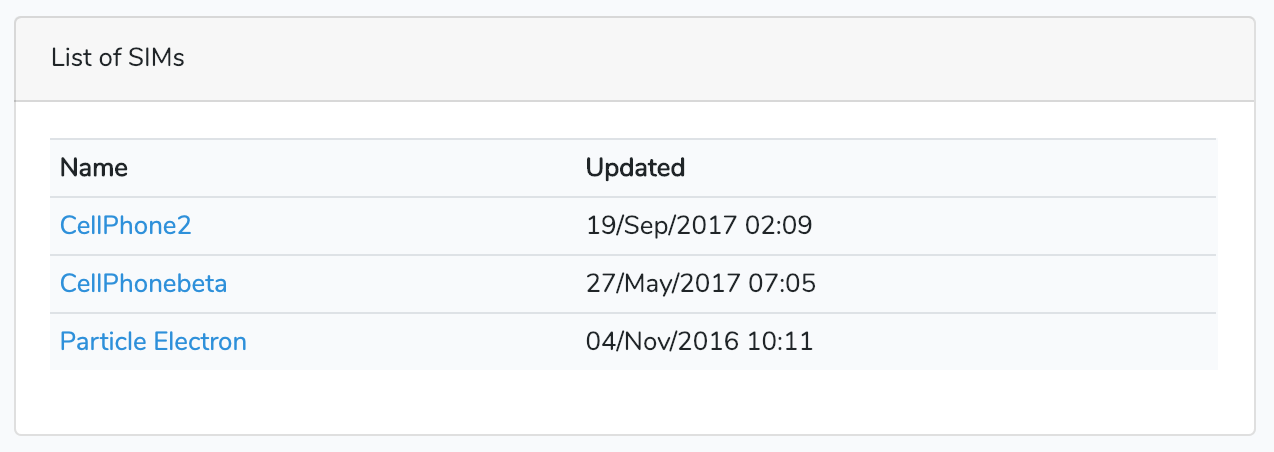
Cool. Now we need to create our blade views that we referenced in our controller actions. The first blade view we will create in the `/resources/views` folder is the “SIM List” view. Be sure to name it `sims.blade.php`. This view will do two things, list all associated SIMs and add an action to view details of the SIM. Make sure to add the `@extends(‘app’)` so that we import our `app.blade.php` file from above. Next, add the `@section(‘content’)`. This is where we will show our list of SIMs on the page and create a link so users can navigate to the action page.
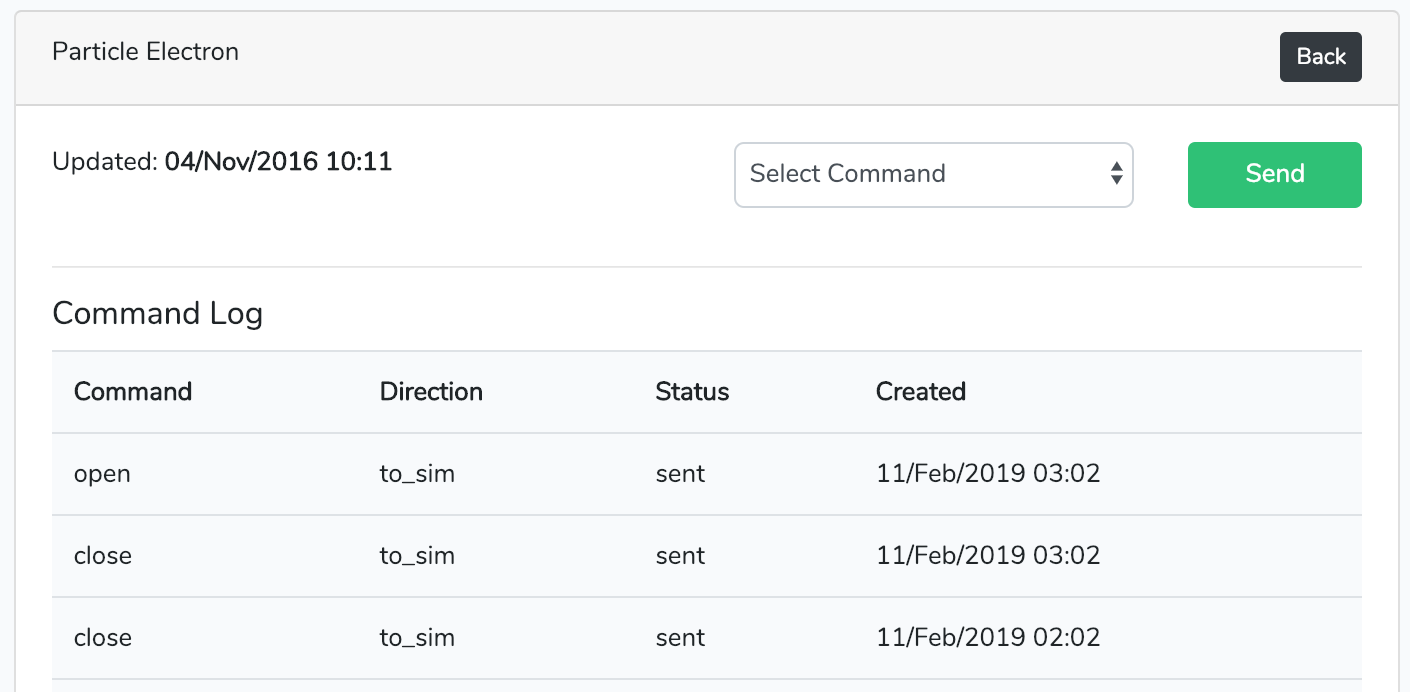
Great, now we can create the detail view for our SIM, which we will name `detail.blade.php`. This view will provide more SIM details, like a command history table and a way for us to send machine-to-machine messages.
One final step before we test the frontend is to specify our new routes that we referenced in our controller. Go to your `routes` folder and open the `web.php` file and include the following three lines.
Now, click on your SIM name to view the details page. If you have not sent any messages to the SIM prior to loading this page, your “Command Log” section will be empty.
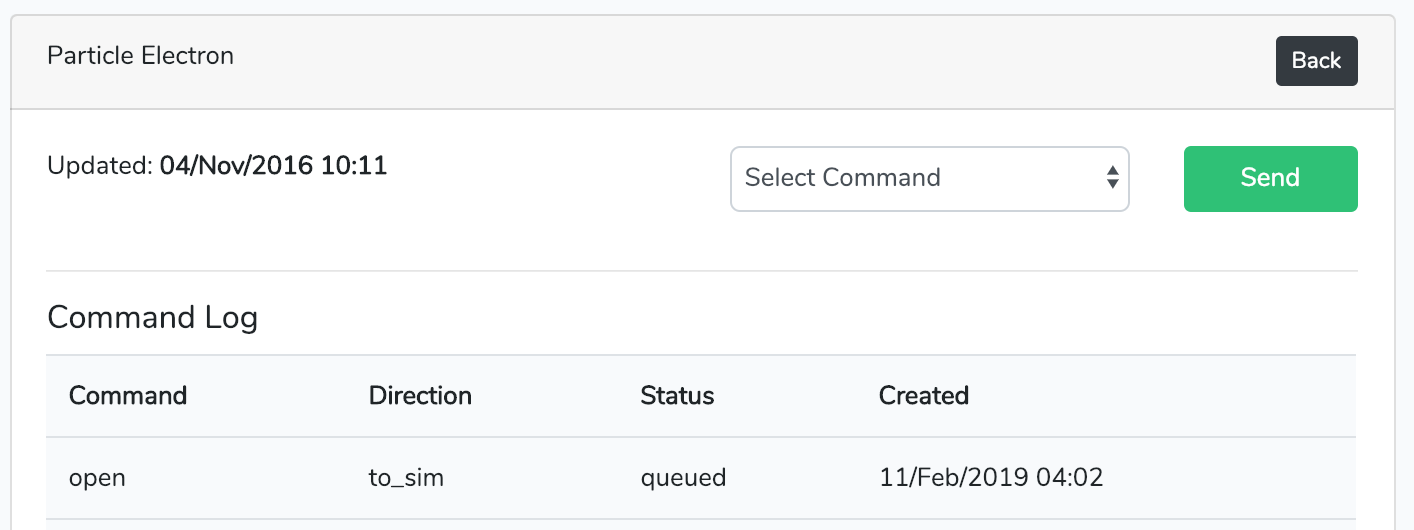
Things are working great. Even though our Electron IoT device code is not complete yet, let’s push a command to our SIM to verify our application can communicate with Twilio without issues. Click on the dropdown to select a command and then click on the “Send” button. The details page will reload and you should see the command you just sent to Twilio in the “Command Log” section.
If you made it this far, congrats! Now we are ready to write some code for our Electron device to receive these commands and control our onboard LED.
Electron Code
To begin writing your code for the Electron, open a browser and navigate to the Particles Web IDE. I have created a link that you can click on to load all the required code in the WEB IDE, which you can find here. After the WEB IDE loads you should see the App and can click on the “Copy this App” button.
Our Electron code will do the following:
Connect to Twilio via the APN “wireless.twilio.com”
Define our onboard LED (act as a relay) and smsBody variables
Setup our “relay” pin mode and check for SMS Mode to verify proper setup.
Enter a loop to check for incoming messages on the Electron Cellular Modem.
If a SMS is received on the modem, we will check the smsBody
If the body is “open” – we cycle the relay on for one second then turn it off.
If the body is “closed” – we cycle the relay on twice at short durations.
Once the message is processed/read, we delete it.
Wait one second, then start the process over again.
First, we will verify our Electron device is selected as our destination device we want to flash our firmware code written to. In the left hand menu, click on the “Devices”. Now locate your Electron device in the list and make sure the start icon next to it is selected and highlighted in yellow. This will send our firmware code to this device when we “flash” it later.
Now, let’s flash our code! Before we can flash our code, let’s be cautious and make sure that it compiles without errors. This is a very safe practice when dealing with remote devices and firmware. Click on the checkmark button in the upper left menu.
If the code compiles without error you will see the following success message. You are now ready to flash the code to your Electron.
To flash, hit the lightning button in the upper left-hand menu. If all goes well, you will see a “flash successful” message. If your device is nearby, you will see your Electron’s onboard LED cycle in a magenta color. Once the Electron boots back up after the firmware update, you are ready to test command delivery to your Electron.
Testing
To fully test, send an “Open” command from the Laravel App to your Electron again. You should see the blue onboard LED turn on for one second and then turn off. If you send a “Close” command, you should see the LED cycle a couple times at short durations. You can control any external sensors or relays similar to how we interfaced with the onboard LED.
Conclusion
That’s it! You connected a PHP web application to an IoT device through the mobile network thanks to Twilio’s Programmable Wireless!
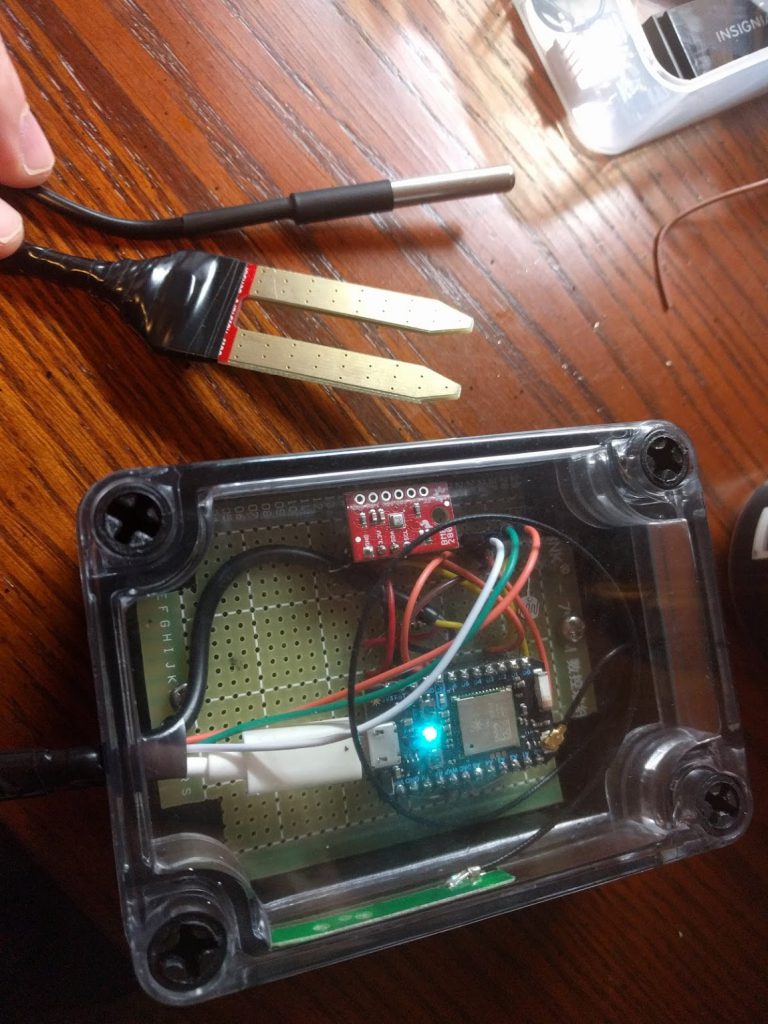
Hey everyone…just wanted to share some data as it relates to measuring conditions of growing mediums. For this example data, a Grodan block was used. These snapshots are being shared as a means to understand and discuss correlations between your mediums temperature, moisture content, air temp and relative humidity.
Looking for a low cost way to have a SIP registered endpoint without a need to run your own VoIP server but still have all the great features of a much more expensive UCS system? The following will outline the steps needed to get a UniFi VoIP Phone (I buy from Streakwave UVP) registered to your Twilio account. New to Twilio? Read up on how the best cloud communications platform works.
Twilio Configuration
To begin preparing your Twilio account to accept SIP registrations, navigate to Programmable Voice -> SIP Domains, then create new SIP Domain. You will need to provide a Friendly Name (SIPTest) and unique SIP URI (siptest.sip.twilio.com). Under Voice Configuration we need to point to a URL where you can host the necessary dynamic language capable of parsing the sip dial string from our endpoint and pulling out the “Called” parameter and dynamically creating the proper TwiML response. Below is the code I used for this example (be sure to use authentication protected and encrypted URL’s). I have not looked into re-creating this script on Twilio Functions yet, but it would be best to keep costs low and reduce complexity. I need to research a little more and will update this blog post once I have a working example for using a Twilio Function.
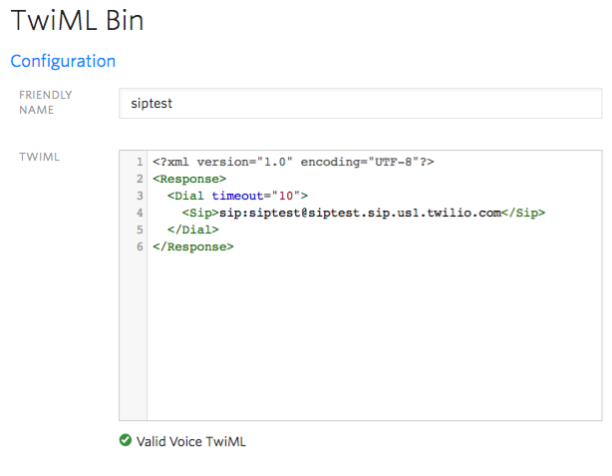
You will also need to tell Twilio what to do with inbound calls to your new endpoint. There are a ton of languages supported and a ton of ways to build smart SIP registered endpoint logic to handle any scenario. For this example, we are keeping it very simple and will just allow an incoming call to a Twilio hosted local number to ring our SIP registered endpoint. The below Twiml is what you program your Twilio number to use when someone dials it. You have the option to use a Webhook, TwiML via TwimlBin or the newly released Functions (more on Functions here).
Under Voice Authentication, create a new “IP ACCESS CONTROL LIST” and “CREDENTIAL LIST”. The IP Access Control list allows you to tell Twilio where to accept registration requests from and the credential list allows you to specify which credentials your endpoints will use to register. Under the SIP Registration, make sure you have enabled the ability for endpoints to register with your new domain then select the credential list entry you created earlier. That wraps up our Twilio side setup for now.
UniFi VoIP Controller and UVP Phone
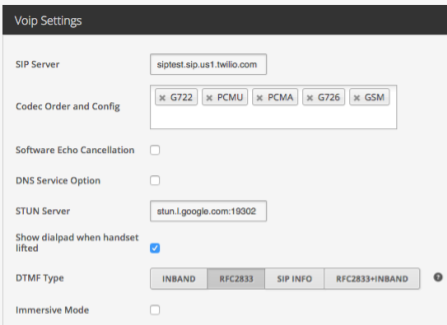
First we need to download the new VoIP controller from UBNT (https://www.ubnt.com/download/unifi-voip/) – version 1.0.5 is the latest. Since we only need the controller to program the phone, you can run this on your local machine. They have installers for Unix, Windows, Mac and Linux so you should be covered. Once you have your controller software installed and you ‘adopt’ your UniFi UVP phone, navigate to your Settings and Global Settings.
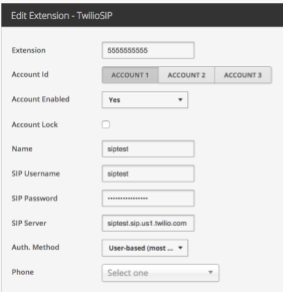
Then go to “Extensions” and “Create New Extension”. For extension, only digits are allowed so entering your Twilio number here might make sense. Name is whatever you want it to be but matching it to your Twilio SIP registration name helps keep things tidy. The SIP username and password need to match the Twilio credentials you created in the first section. Likewise, the SIP server needs to be your SIP URI you created above. Authorization method is User-based and select your discovered UVP phone from the dropdown.
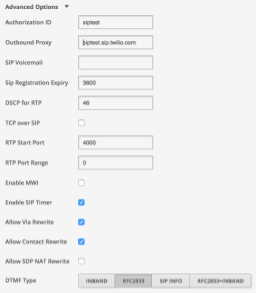
Additional settings under “Advanced Options” that I have tested as working successfully are listed below.
Once all your settings are in place – click Apply to save this configuration and push out the configuration to your UVP phone. If all goes well, you should see your phone reboot after receiving it’s configuration. Once your phone is ready, test by making an outbound call and inbound calls. Your phone should be able to call any outside line and you should be receiving inbound calls to new registered VoIP phone.
If you run into issues, the first place to start is to make sure your endpoint is registered. Navigate to your Voice SIP Domain and click on the “Registered SIP Endpoints” to do a search for your endpoint name under your domain. If registered, you should see one result under your device name. It should also allow your to see the type of phone and version in the results section along with contact and expiration information. Once you confirm you have a successful registration, it is just a matter of watching the logs if things are not working as expected and completing a little debugging.
As always – feel free to shoot me an email via this sites contact page or reach me on Twitter @cbackescom.
This example will enable you to turn your dumb garage door into a smart bot that you can ask questions. Make sure if you use this code you protect your communications to/from Twilio by hardening the communication. Encryption and password protected URLs are a must for this type of project. Information captured on the open Internet that allow an attacker to obtain entry into your garage/home is dangerous. I have not included a security code in addition to the security steps outlined below so use at your own risk!! Twilio Authy would be something you might want to add to this project as well.
PHP Server Code
First, you will need to find a place to host the example PHP code. To get started, I would recommend developing locally and just exposing the code from an ngrok url. If you are more comfortable in Javascript, take a look at Twilio Functions. Below is a breakdown of the example PHP code.
Create an array to hold all the contacts we want to grant access to sending commands to the garage door.
Check incoming requests from Twilio to verify ‘From’ is equal to a number in our array.
Run variables through comparison logic to determine what action we want to take.
Retrieve the ‘status’ of the doors, are they up or down?
After you have your PHP code served up, it’s time to fire up your Particle device (Photon in this example) and flash some code! I will not go over that process in it’s entirety, but it is as simple as copying my example code into the Particle Web IDE and flashing the device.
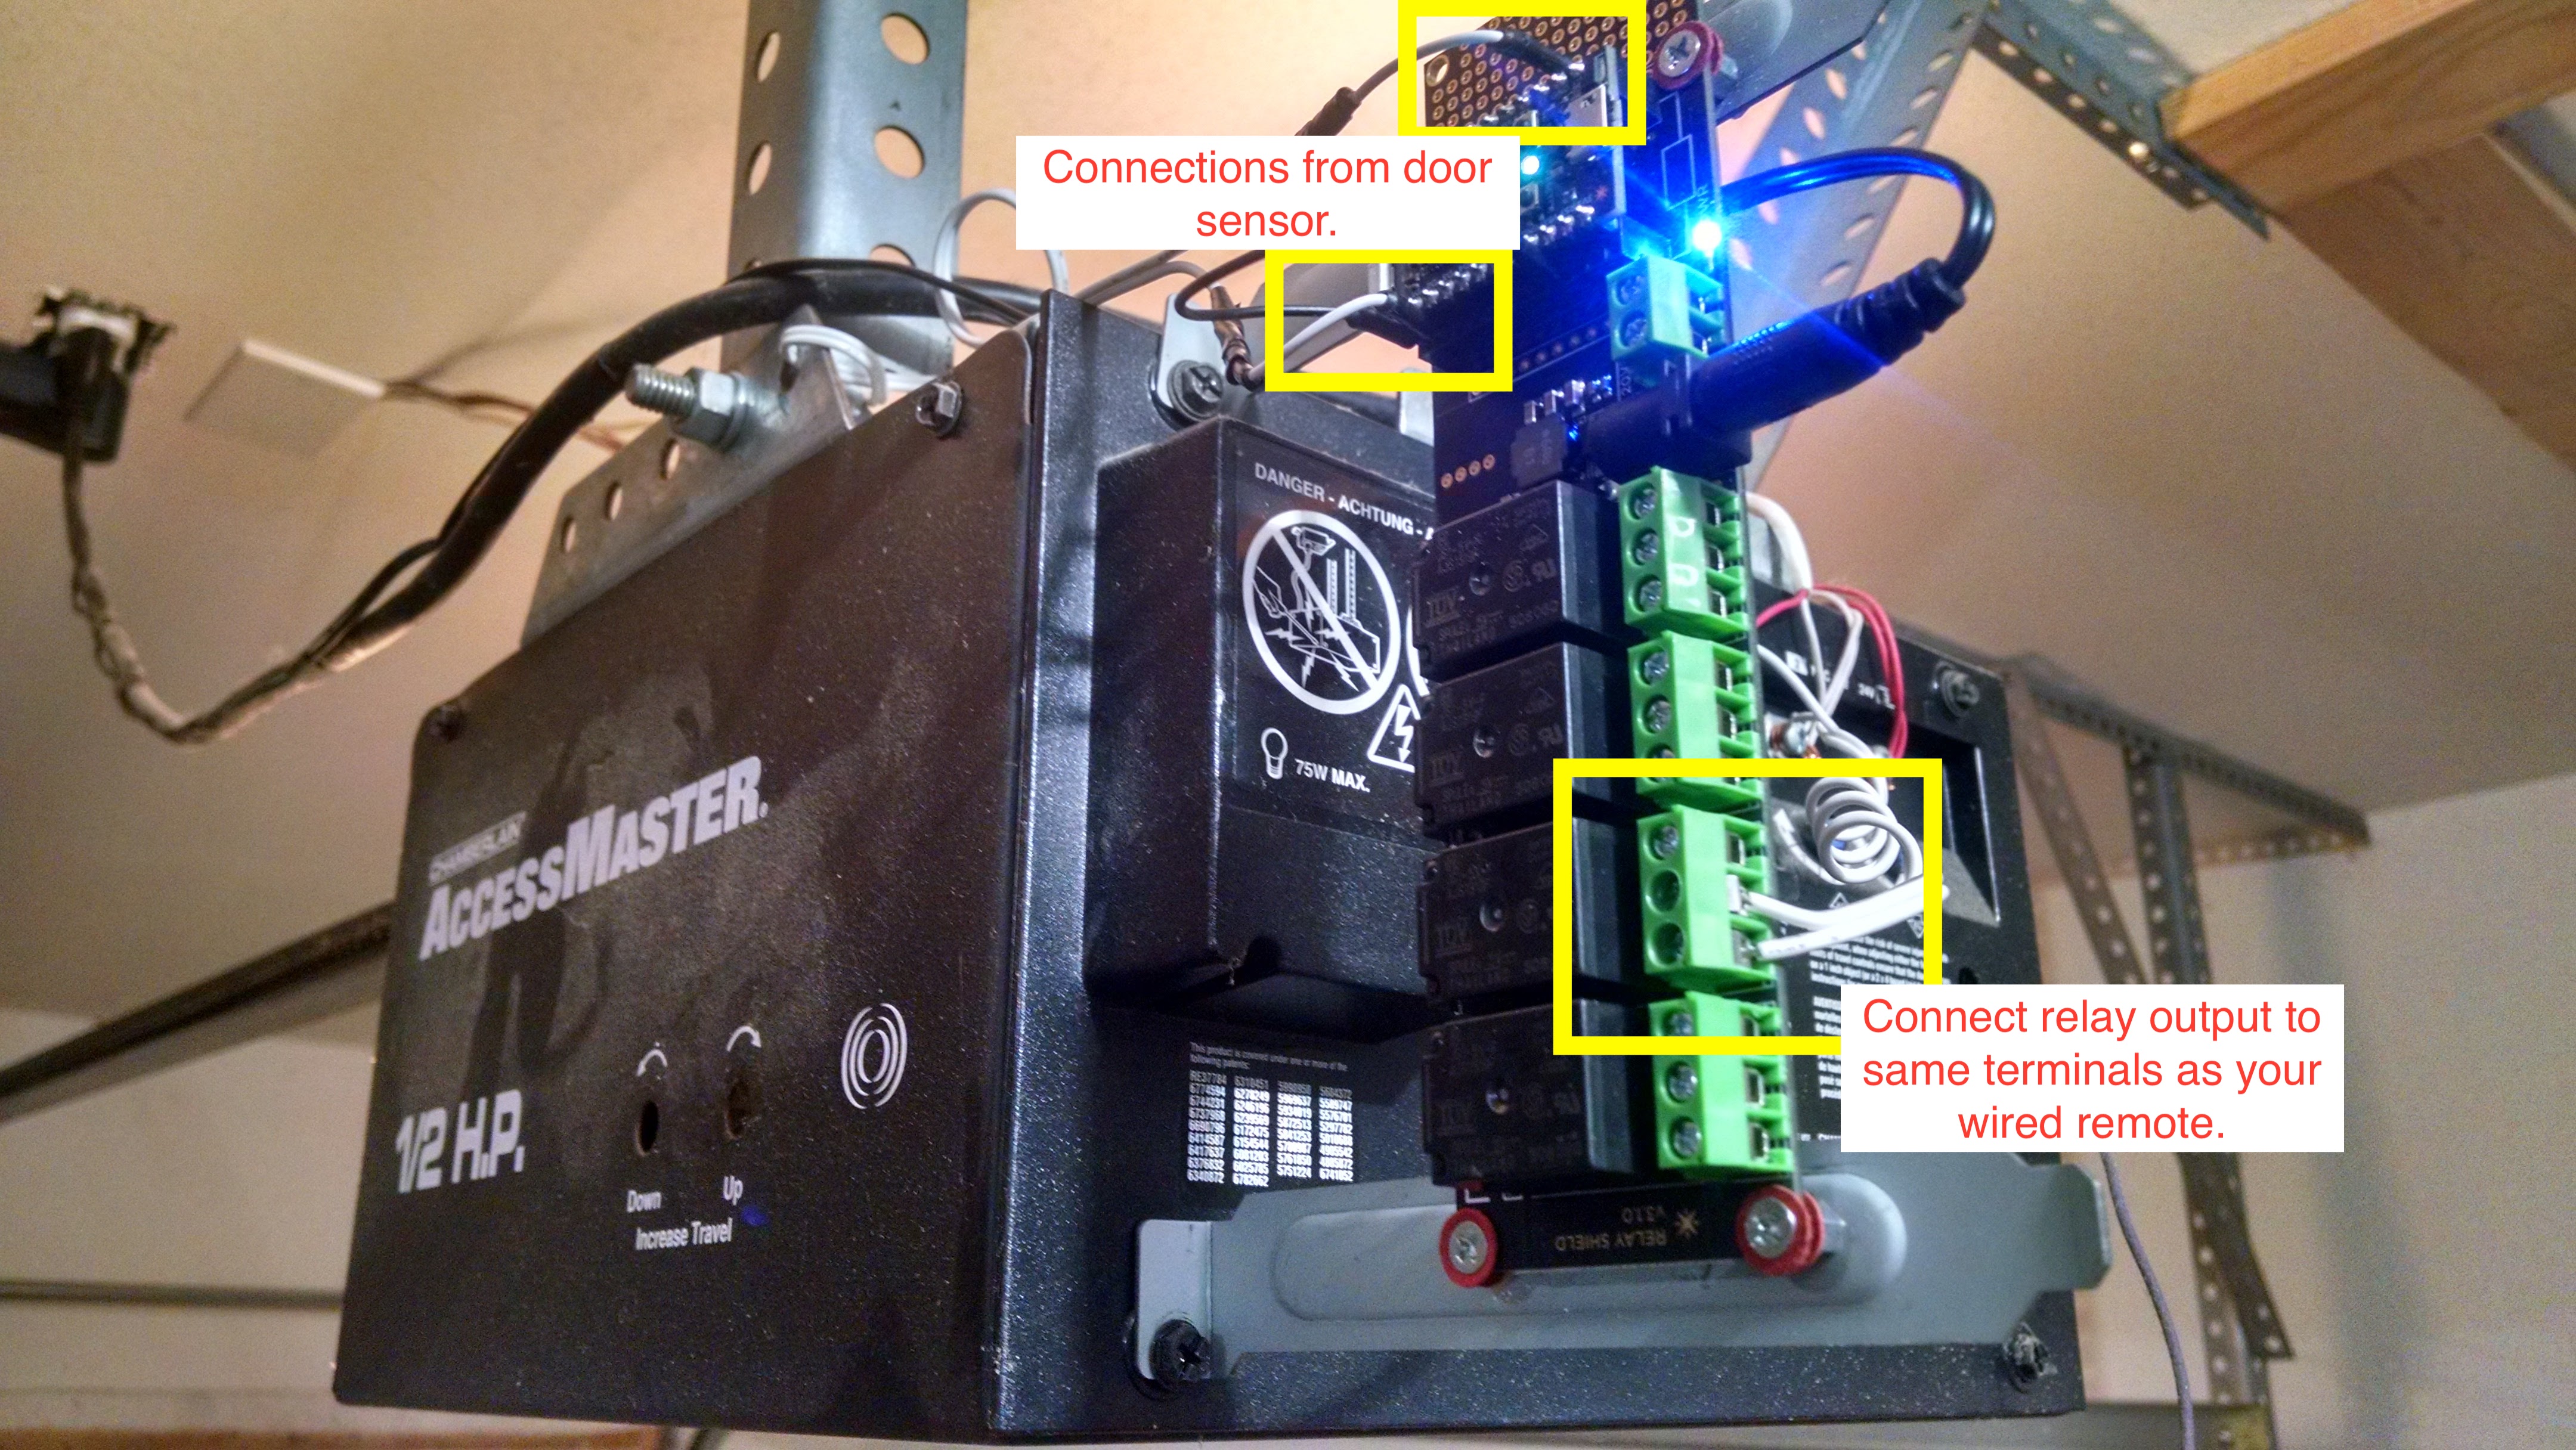
Once you have your code flashed, you are all set to connect all the pieces. First plug in your photon (with headers) into the Relay Board. Next, plan out how you will mount the Relay Board near your garage door drive motor unit. I determined this is the best place to locate the device since we will need power and direct connections from the relays to the garage door drive motor unit. You will also want to run a wire between the output of your relay to the terminals on the back of drive unit. You will want to use the same terminals that come from the wired remote in your garage. Below is an example of how you can connect things.
Twilio Setup
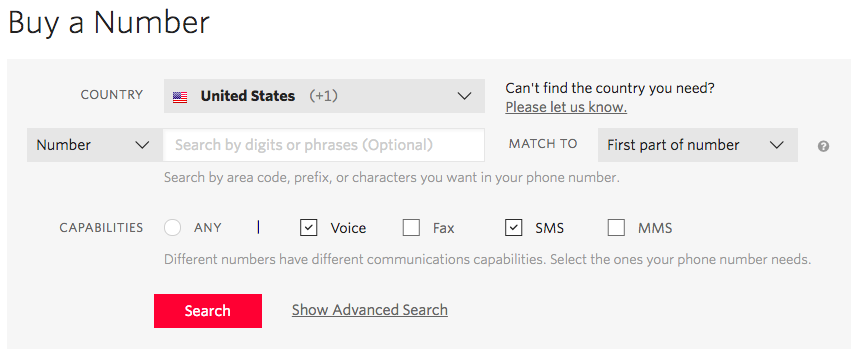
Similar to any other Twilio project, make sure you have your account created. If you do not, head on over to Twilio and get signed up now! After you have your account setup, purchase a telephone number if you do not already have one. While you are purchasing, make sure you buy one that has the SMS capability since we will be using SMS 🙂
Once you have your new number, head to PhoneNumbers->ActiveNumbers in your console and click on your new number.